👁 0 views
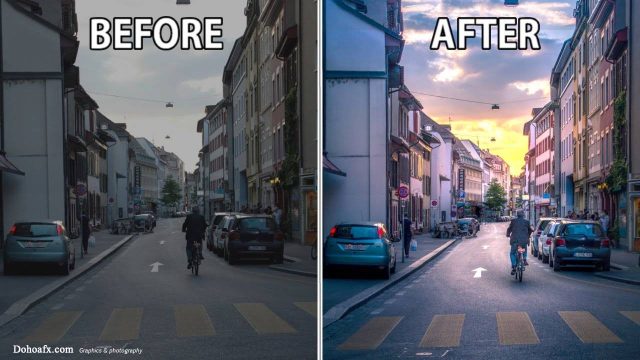
Yes, you can always turn a day scene into a night scene with the power of Photoshop! In this tutorial, I’ll show you how to play with the brightness of the scene, how to add stars to the sky, and how to add new light sources with beautiful effects.
We’ll create a photo like this


Table of contents 7 items
Preparation
You can use any photo you need for this exercise. If you want to follow my steps exactly, you can find the photos I used here:
1. How to Select the Sky
Step 1
Open your photo in Photoshop. Select the Magic Wand Tool (W) and change the Tolerance to 100 .
Step 2
Select the sky area

Step 3
Switch to Quick Mask Mode (Q) to paint over the areas that are not sky (paint with black so they turn red).

Step 4
Exit Quick Mask Mode (Q) and go to Select > Refine Edge to make sure the selection is perfect. Choose a view mode that lets you see the result best.


Step 5
Now check Smart Radius and increase its value. Here I increased it to 16.4px . You can also adjust the other sliders to get a perfect result. When you’re done, click OK .


2. How to Darken the Sky
Step 1
Go to Window > Adjustments. Select Hue / Saturation

Step 2
Clip the Adjustment Layer to the layer below (the sky). Then change the Lightness to make the sky darker, but don’t let it turn black


Step 3
Every Adjustment Layer has a Layer Mask.
When you paint on the mask, you define the transparency of the layer: black makes the layer transparent, white makes it opaque, and shades of gray become the in-between states.
Click the mask to make it active.

Step 4
Use the Gradient Tool (G) and click the gradient in the top bar.

Change the gradient to white–light gray.

Step 5
Apply the gradient to the mask from top to bottom. This will make the top part “white” (opaque) and the bottom part “light gray” (slightly transparent).


Step 6
Now click the background layer. We need to make it a bit darker too! In Adjustments, find Photo Filter.

Step 7
Change the color to a dark, desaturated blue.


Step 8
Uncheck Preserve Luminosity

Leave Density at 100%


Step 9
Now let’s add a bit of blue to the sky. Use a Photo Filter adjustment, this time with a brighter, more saturated color.


Step 10
Usually the night sky is brighter than the unlit buildings below it, so darken this lower layer even more. Duplicate (Control-J) the Photo Filter adjustment and lower the Opacity to adjust the intensity.


3. How to Create the Stars
Step 1
Create a New Layer on top. Use the Paint Bucket Tool (G) to fill it with black. Then go to Filter > Noise > Add Noise. Add the maximum amount, in black and white.

Step 2
Now go to Filter > Filter Gallery and choose Sketch > Stamp. Adjust the settings to create a suitable effect. The sky isn’t completely clear, so there shouldn’t be too many stars.

Step 3
Use the Move Tool (V) to move the stars up into the sky.

Step 4
Right-click the stars layer and choose Blending Options . Drag the upper black marker to make the dark parts of the layer transparent.

Step 5
Add a Layer Mask to this layer. Use a black-and-white gradient to make the lower part invisible, gradually changing to gray toward the top.


4. How to Highlight the Windows
Step 1
Select the Polygonal Lasso Tool (L) to outline the window panes

Step 2
Click the background layer and duplicate the selection (Control-J) . Move the copied layer to the top.

Step 3
Right-click the layer and choose Blending Options . Check Color Overlay in Blend Mode and change the color to bright orange.


Step 4
Click Blend Mode and scroll through it until you find an effect you like. I decided to use Hue, because it adds color without hiding the details.


Step 5
Check Outer Glow .

Change its color to bright orange.

Step 6
Choose the same Blend Mode

… and adjust the sliders to get the effect you want.

Done, and it looks pretty nice, doesn’t it?

5. How to Add a New Light Source
Step 1
Let’s make something like a lantern next to the house. We’ll use it to decorate the house! Use the Polygonal Lasso Tool (L) to select its shape.

Step 2
Click the background layer, duplicate the selection (Control-J) and drag the new layer to the top.

Step 3
Right-click the layer and choose Blending Options . Choose Color Overlay and set it to white

Step 4
Choose Outer Glow and choose the color as shown in the image


Here I set the Blend Mode to: Hard Light


Step 5
Create a New Layer and drag it right below the lantern. Choose a bright orange and use a soft brush to paint light around the lantern.


Step 6
Go to Blending Options and set it up as shown


Hold the Alt key to split the marker for a smoother transition. If you want to learn more about this technique, check out this quick tutorial:
Step 7
Scroll through the Blend Modes of this layer to find the best effect.

Step 8
Add a Layer Mask to this layer and paint shadows on it. It doesn’t need much detail – just make sure the light doesn’t reach the blocked parts. Use black to paint shadows and white to remove them, until it looks OK to you

Step 9
Create a new layer and pick a bright orange color again.

Lightly paint some highlights on the protruding elements of the building

Step 10
Change the Blend Mode and add a Layer Mask to make the effect more subtle.
Step 11
Finally, duplicate the light (Control-J) and change its color to white.

Then remove it from the darker parts, leaving it only on the bright parts of the building.
Change the Blend Mode and lower the Opacity to adjust the intensity of this effect.

6. How to Add a Late Dusk / Early Dawn Effect
Step 1
Let’s make the final adjustments to the brightness of the scene. Go to the top of the layer stack and add a new Adjustment Layer: Levels .

Drag the white marker to the left to increase the amount of light tones in the scene.
Step 2
Create a new layer . Fill it with black, then go to its Blending Options and open the Gradient Overlay section.

Choose sunset colors 😀
Step 3
Hold Control and click the sky layer to get its outline.
Step 4
Click the gradient layer and add a Layer Mask . The selection will be applied to the mask automatically.

Paint on the mask to reveal the mountains in the back.

Step 5
Duplicate the sky (Control-J) and drag it to the top. We’ll add special effects to the clouds.

Add a Hue/Saturation adjustment.

Adjust the Adjustment Layer for the duplicated sky, making it more saturated and a bit brighter.

Step 6
Adjust the Levels to add more contrast to the sky
Step 7
Select all three layers (the sky and its adjustment layers) and Merge them (Control-E) . Then go to the Blending Options of this new layer and remove it from the bright parts of the sky using the lower white markers. Change the Blend Mode to Soft Light and lower the Opacity .
Step 8
Duplicate (Control-J) the layer and adjust the Blending Options, this time removing it from the dark parts of the sky (lower black markers). Change the Blend Mode to Soft Light as well, but leave the Opacity at 100% , and adjust it with a layer mask if needed.
Step 9
Add an Exposure adjustment on top to play with the overall brightness.

Drag the sky down to change the colors gradually (you can do this using a Layer Mask).

Step 10
The background seems a bit bright, so darken it using a Hue/Saturation adjustment with some masking.

Step 11
When you’re done, Merge all the layers ( right-click > Flatten Image) and add Noise > Add Noise.

Sharing computer, Windows and software tips. If you have a question, leave a comment below.